Introduction
The current workflow of C/C++ projects is usually a CMake-based multi-file project, and most of the debug methods introduced on the Internet only have a hello world example, which is far from meeting our needs. This article will introduce how to debug multi-file C/C++ projects in VSCode.
Step
Some explaination based on ChatGPT
-
Create a
.vscodefolder in the root directory of your project if it doesn’t exist already. This folder will contain the necessary configuration files.
-
Open VS Code and navigate to the Debug view by clicking on the bug icon on the sidebar or pressing
Ctrl + Shift + D(Cmd + Shift + Don macOS).
-
Click on the gear icon at the top of the Debug view and select “Open launch.json” from the dropdown menu. If you already have a
launch.jsonfile, skip this step.
-
In the
launch.jsonfile, you’ll define your debug configurations. For a multi-file program based on CMake, you can use the following configuration as a starting point:{ "version": "0.2.0", "configurations": [ { "name": "C++ Launch", "type": "cppdbg", "request": "launch", "program": "${workspaceFolder}/build/your_executable_name", // Update with your actual executable name "args": ["<", "3.in"], // Arguments passed "stopAtEntry": false, "cwd": "${workspaceFolder}", "environment": [], "externalConsole": false, "MIMode": "gdb", "miDebuggerPath": "/usr/bin/gdb" // Update with your GDB path } ] }Make sure to replace
your_executable_namewith the actual name of the executable produced by your CMake build.
-
Save the
launch.jsonfile.
-
Next, you need to configure the build task. Click on the gear icon again in the Debug view and select “Tasks: Configure Task” from the dropdown menu. This will create or open the
tasks.jsonfile.
-
In the
tasks.jsonfile, you’ll define the build task for CMake. Add the following configuration:{ "version": "2.0.0", "tasks": [ { "label": "build", "type": "shell", "command": "cmake --build build", // Update with your CMake build directory if different, "options": { "cwd": "${workspaceFolder}" // Build result directory, it should be the place where CMakeList.txt is }, "group": { "kind": "build", "isDefault": true }, "presentation": { "reveal": "always" }, "problemMatcher": "$gcc" } ] }Make sure to adjust the
commandfield if your CMake build directory is different from"build".
-
Save the
tasks.jsonfile.
-
Now you can entry the debug mode with following command:
- Build: Ctrl+Shift+B
- Launch: Ctrl+F5
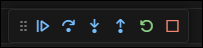
When the debug mode is running, you will see a series of instructions at the top, according to which you can step through the code, step into the function, etc.